
Bakery · CombiSteel Knowledge Hub
Plan a Small Bakery Layout from Mixing to Cooling and Dispatch with CombiSteel
Plan a streamlined small bakery setup with CombiSteel equipment, from mixing to cooling and dispatch, tailored for Irish commercial kitchens.
In this guide
You are not just fitting equipment into a room. You are setting up a one-way production line so mixing, make-up, baking, cooling and packing do not clash at peak time.
This guide shows how to map that flow using three common anchors:
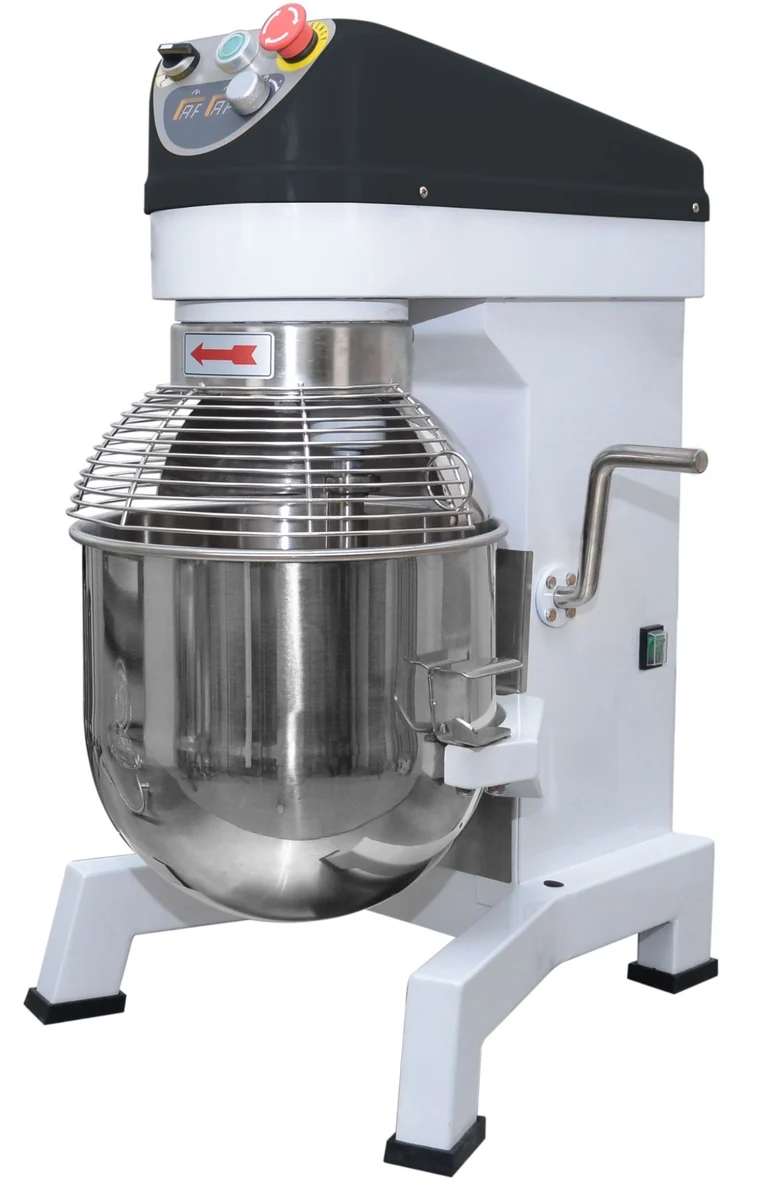
- CombiSteel 7534.0010 planetary mixer (rated 20 L, max kneading 7.5 kg, max flour 5 kg, 1 kW, 230 V) from the manufacturer manual (p.5): CombiSteel Planetary Mixer manual for models 7534.0005–7534.0020 (p.5)
- CombiSteel EC1 convection oven 7500.0005 (listed 4 grids, 435 × 315 mm grids): Caterboss listing: CombiSteel EC1 convection oven 7500.0005
- CombiSteel Standard Line refrigerated bakery counter 7450.1215 (listed 600 × 400 mm grid size, 12 guide pairs): Caterboss listing: CombiSteel Standard Line refrigerated bakery counter 7450.1215 (2 doors)
The real work is planning the pinch points: where hot trays land, where cooling racks live, and how many trays are in circulation so the oven does not stall. You will also plan around trade-offs like mixed tray formats (EC1 435 × 315 versus counter 600 × 400) and safe access for accessory changes at the mixer.
Introduction to small bakery layout planning
A small bakery layout works best when it supports a simple, one-way flow:
ingredient storage and scaling → mixing → make-up → baking → cooling → packing and dispatch
The aim is practical: fewer steps, less backtracking with hot trays, and fewer moments where raw handling and ready-to-pack product share the same space.
The common trap in a tight unit is calling it “efficient” because everything fits. If equipment ends up squeezed into corners, you lose cleaning access, create awkward carry routes, and staff start working around the layout instead of with it.
Mixing to dispatch is a workflow problem first
In Irish cafés, small retail bakeries, and hotel pastry sections, delays usually happen at hand-offs:
- where scaled ingredients land before the mixer
- where trays queue between make-up and the oven
- where hot trays land before they move to cooling
- where finished items queue for packing and collection
If those points are unclear or too far from the work, you get double-handling, bottlenecks at the oven, and “temporary” parking on prep benches that becomes permanent.
What good flow looks like in a small bake space
You do not need a big room. You need zones that read in order, left-to-right or clockwise, with a clear forward handover each time:
- Ingredients and scaling
- Mixing
- Make-up and tray-up
- Baking and a hot-tray landing spot
- Cooling, packing and dispatch
Two separations are worth protecting from day one:
- Keep raw, floury work away from the finishing and packing bench.
- Keep a direct route for hot trays from oven to cooling, without cutting across prep.
Why layouts that look fine at 10am fail at 8am
Compact bakeries often feel workable until the rush hits: the oven is cycling, benches are covered, and someone is trying to pack orders while another person is loading trays.
The fix is rarely “more space”. It is keeping the through-route (oven → cooling → packing) clear, and keeping the clean finishing area out of the flour and traffic.
Choosing the right CombiSteel equipment
In a small bakery, equipment choice is workflow choice. Your footprint, your tray format, and your real pinch point (labour, oven throughput, chilled holding) should decide the spec.
CombiSteel 7534 planetary mixers: use the rated flour and kneading limits, not just bowl litres
If you switch between dough, batter, creams and icing through the day, a planetary mixer is often the practical fit. The 7534 range is described as a “Planetery Mixer” in the manufacturer manual: CombiSteel Planetary Mixer manual for models 7534.0005–7534.0020 (p.1)
For layout and production planning, the useful part is the model-by-model rating table. For 7534.0010, the manual lists:
- 20 L bowl
- Maximum kneading: 7.5 kg
- Maximum flour: 5 kg
- Power: 1 kW
- 230 V
Source: CombiSteel Planetary Mixer manual (capacity table, p.5)
That gives you a defensible starting point for batch sizing. It also avoids the common mistake of assuming a simple “kg per litre” conversion across a mixer range. The same table shows different ratios across the 7534 family.
The manual also includes attachment recommendations (hook, flat beater, wire whip) with typical uses. Treat this as planning input for what needs to live beside the mixer during service:
- Hook: raised donut dough (65% AR), pasta, basic egg noodle, heavy bread dough (55% AR), bread and roll dough (60% AR), pizza dough (40% AR)
- Flat beater: waffle or hotcake batter, mashed potatoes, fondant icing, cake flat, pie dough
- Wire whip (light): whipping cream, egg whites, meringue
Source: CombiSteel Planetary Mixer manual (attachment recommendations, p.8)
One layout detail to bake in early: the manual states “Always disconnect or unplug power before cleaning, servicing or adjusting parts or accessories.” If the isolator or plug is blocked by joinery, that job becomes slower and riskier than it needs to be.
Source: CombiSteel Planetary Mixer manual (safety instruction, p.7)
If you want to translate rated flour and kneading maximums into realistic batch planning, start here: CombiSteel mixer bowl litres, flour and dough capacity guide.
CombiSteel EC1 convection oven 7500.0005: plan around 4 tray positions and a smaller tray format
In very small bake rooms, tray format and tray count drive everything downstream: landing space, cooling space, and how much traffic ends up in front of the oven.
The CombiSteel EC1 7500.0005 is listed with:
- Grid size: 435 × 315 mm
- Number of grids: 4
Treat “4 grids” as four in-oven positions you need to unload cleanly, without parking hot trays on prep benches.
CombiSteel Standard Line refrigerated bakery counter 7450.1215: chilled holding built around 600 × 400
A refrigerated bakery counter earns its keep when it cuts steps and keeps temperature-sensitive items within reach.
The CombiSteel 7450.1215 is listed with:
- Grid size: 600 × 400 mm
- Number of guide pairs: 12
Treat guide pairs as the available support levels inside the cabinet, not a guarantee of how many fully loaded trays you can hold in day-to-day use.
The compatibility issue you need to decide early: two tray formats
The EC1 uses 435 × 315 mm grids, while the bakery counter is built around 600 × 400 mm.
If you accept that early, layout gets easier. Give each tray type a “home” in the workflow, and plan any transfers as a deliberate step away from the oven door. That stops the oven front becoming a permanent shuffle point.
Designing an efficient workflow
Arrange the space as a one-way line: ingredients and scaling → mixing → make-up → baking → cooling → packing and dispatch.
To make that workable with the three models above, design around three fixed facts:
- Mixer batch limits are set by the manual for your exact model.
- Oven throughput is limited by 4 grids in the EC1 listing.
- Chilled holding is on 600 × 400 in the counter listing.
Your fillable one-way zone plan (use this to draw your floor plan)
Use this as a working sheet. Fill in what you know, and leave anything unknown blank until you have measured the room and agreed the operating flow.
Boundary for tray counts: decide whether your numbers are outside the oven only or total in circulation including the oven. This guide uses both, clearly labelled, in the worked example below.
Swipe or scroll horizontally to see all table columns.
| Zone/task (in order) | Model (if relevant) | Tray format used in this zone | Simultaneous parking positions (your number) | Incoming/outgoing hand-off (what moves where) | Traffic/conflict notes (what tends to clash) |
|---|---|---|---|---|---|
| Ingredients and scaling | In: goods-in or dry store. Out: weighed ingredients to mixing. | Keep flour/dust away from finishing. | |||
| Mixing | CombiSteel 7534.0010 (20 L; max kneading 7.5 kg; max flour 5 kg; 1 kW; 230 V) Source: CombiSteel Planetary Mixer manual (p.5) | Bowl only (no trays) | In: scaled ingredients. Out: dough/batter to make-up bench. | Allow access to disconnect/unplug as required by the manual before accessory adjustment. Source: manual p.7 | |
| Make-up and tray-up | Typically 600 × 400 if you are feeding the 7450.1215 | In: mixed product. Out: trays queued for oven or transfer. | Decide where the 600 × 400 to 435 × 315 transfer happens (if needed). | ||
| Baking | EC1 7500.0005 (4 grids; 435 × 315) Source: Caterboss listing: EC1 7500.0005 | 435 × 315 | 4 in-oven (fixed by listing) | In: 435 × 315 trays. Out: hot trays to landing. | Keep the door area as working space, not storage. |
| Hot-tray landing and cooling | 435 × 315 (if coming straight off EC1) | In: trays from oven. Out: cooled product to packing or re-tray. | This is where rush-hour blockages happen. | ||
| Packing/finishing | In: cooled product. Out: packed orders to dispatch or chilled holding. | Keep this as the cleaner bench, away from flour. | |||
| Chilled holding | 7450.1215 (600 × 400; 12 guide pairs) Source: Caterboss listing: 7450.1215 (2 doors) | 600 × 400 | In: finished items for holding. Out: service/dispatch. | Guide pairs are support levels, not a promise of “12 loaded trays” in real use. | |
| Dispatch/collection | In: packed orders. Out: pass to front of house/courier/customer. | Keep it out of the hot-tray route. |
1. Set the one-way flow first, then place equipment to suit it
Start with a simple arrow on your floor plan from goods-in to dispatch. Your goal is that product only moves forward.
In most small units, the pinch point is cross-traffic between:
- slow, precise work (scaling, mixing, shaping)
- fast, higher-risk work (loading and unloading hot trays)
A reliable way to reduce clashes is to keep the hot zone (oven, landing, cooling rack) at one end, and the prep zone (ingredients, scaling, mixer, make-up) at the other.
2. Build the prep zone around the 7534.0010 as a low-traffic mixing station
Treat the CombiSteel 7534.0010 as the anchor for prep. Its rated capacity row in the manual lists 20 L, max kneading 7.5 kg, max flour 5 kg, 1 kW, 230 V.
Source: CombiSteel Planetary Mixer manual (capacity table, p.5)
Place it beside your scaling bench and your dry store pick area. That keeps ingredient movement short and avoids carrying full bowls through the bake zone.
When you draw the station, include access to disconnect or unplug power as the manual requires before adjusting accessories.
Source: CombiSteel Planetary Mixer manual (safety instruction, p.7)
3. Position the oven so hot trays go straight to cooling
With the EC1 (7500.0005), treat the space in front of the door as working space, not storage.
Aim for a direct move:
oven → landing surface → cooling rack
Because the EC1 is listed with 4 grids, plan your landing and cooling so you can unload a full set cleanly when needed.
If your make-up is on 600 × 400 trays, plan a deliberate transfer point away from the oven front. Otherwise it becomes an improvised shuffle at the door.
4. Use cooling and chilled holding as the buffer between baking and dispatch
Most bottlenecks are not at the mixer. They happen when baked product has nowhere to go, so unloading slows down, baking pauses, and the whole line backs up.
A practical order on the “after oven” side is:
- Cooling rack (first stop)
- Packing/finishing bench
- Chilled holding (last stop)
If you are using the 7450.1215 counter (listed 600 × 400), keep it on the finishing side of the flow, away from the oven front. That reduces traffic around the hot zone.
5. Sanity-check your peak tray count (define what you are counting)
Tray counts are layout maths. They are not an equipment approval statement.
Pick one counting boundary and stick to it:
- Outside the oven: what you need space for at benches, racks and chilled holding.
- Including the oven: the total trays you need in circulation.
A simple hypothetical snapshot using one EC1 oven (listed 4 grids), one 600 × 400 refrigerated bakery counter, and a small make-up bench might look like this at peak.
Outside the oven (space you must provide):
- Preparation and make-up queue: 6 trays
- Cooling/landing: 4 trays
- Cold holding: 8 trays
That is 18 trays outside the oven.
Including what is in the oven (total in circulation at that moment):
- Add 4 trays in the EC1 (based on the listed 4 grids)
That is 22 trays in play in total (6 + 4 + 8 + 4).
If your real peak is higher than your landing space and racking can absorb, the fix is usually operational or layout-led: standardise tray formats by stage, add another cooling rack bay, or reduce batch size so unloading does not swamp cooling and packing.
Case study: hypothetical small bakery setup
Here is a hypothetical CombiSteel-based line for a tight back-of-house where one person mixes and one person bakes and packs during the morning run.
The point is not to prescribe a “perfect” bakery. It is to show how three anchored specs shape the layout: mixer batch limits, four in-oven positions, and two tray formats.
A workable one-way workflow using the three models
Prep end (low traffic): ingredients and scaling → CombiSteel 7534.0010 mixing station → make-up bench.
Bake end (hot zone): EC1 7500.0005 → landing surface → cooling rack.
Finish end (cleaner zone): packing/finishing bench → 7450.1215 refrigerated bakery counter → dispatch.
Model sources:
Straight-line vs U-shaped workflow in a tight Irish unit
Straight-line suits narrow galley units: mixer → make-up → oven → cooling → packing → dispatch. It is easier to manage because the hot-tray route does not cut back through the mixing station.
A U-shaped layout can reduce steps, but only if you can keep the inside of the “U” clear. If the centre becomes storage, you end up squeezing past each other with hot trays.
Where the tray-format decision shows up in real life
With this equipment pairing, you are living with two tray standards:
- EC1: 435 × 315 mm grids (listed)
- Counter: 600 × 400 mm guides (listed)
The tidy approach is to stop them mixing by accident:
- Keep 435 × 315 trays and racks on the oven and cooling side.
- Keep 600 × 400 trays at make-up and chilled holding.
If you need to transfer product between formats, give it a dedicated spot on the make-up side, not at the oven door.
Considerations for tray and rack placement
Tray and rack placement is a workflow decision, not just storage.
- Keep the hot-tray path short and direct. If trays have to cross back through prep, you will lose time and end up parking hot trays on whatever surface is free.
- Give the oven a dedicated landing spot that stays clear. With a 4-grid oven, a “small bit of counter” disappears quickly when you are unloading.
- If you are mixing tray formats, lock it down on paper before you buy racking and counters. Tray size drives clearances and guide spacing.
For help matching tray standards across equipment, use the CombiSteel GN and bakery tray sizes guide.
Next step: price up the core mixer for your layout
If you are turning a layout into a purchase list, start with the mixer. The mixer’s rated kneading and flour limits set your batch size, which drives how many trays you need to queue, bake and cool.
See the CombiSteel 20L planetary mixer (model 7534.0010) on Caterboss for current availability and ordering details: Caterboss listing: CombiSteel Planetary Mixer 20L (7534.0010)